ruby on rails では簡単にtwitterやfacebookと認証ができるライブラリがあります。
それがomniauthです。
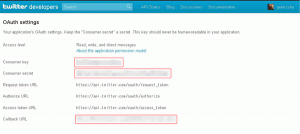
Twitterdeveloperに登録する
Twitter Developer
上記から入って登録していきます。
今回必要なのは赤枠でくくっている。

・Consumer key
・Consumer secret
・Callback URL※戻り先のURL
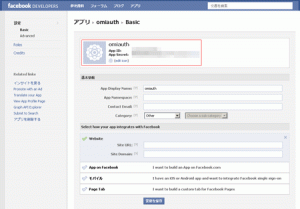
Facebookdeveloperに登録する
Facebook Developer
上記から入って登録していきます。

ここで必要なのは赤枠の部分です。
・App ID
・App Secret
Gemのインストール
gemでomniauthをインストールします。
gem 'omniauth'
後は、ライブラリをインストールします。
bundle install
nokogiriのinstallエラー
libxml2が無いとインストールができません。
CentOS,RedHot:OS別のインストール方法
yum install -y libxml2 libxml2-devel libxslt libxslt-devel
gem install nokogiri
omniauthを組み込む
Railsに組み込むためにconfig/initializersの中に下記のようなファイルを作ります。
config/initializers/omniauth.rb
Rails.application.config.middleware.use OmniAuth::Builder do
  provider :twitter,"Consumer key","Consumer secret"
 provider :facebook,"App ID","App Secret"
end
ルーティング
ルーティングがなるようにroutes.rbを設定します。
config/routes.rb
match "/auth/:provider/callback" => "sessions#callback"
match "/logout" => "sessions#destroy", :as => :logout
ユーザーテーブル作成
omniauthのユーザー用のテーブルを用意します。
$rails generate model omniuser provider:string uid:string
name:string screen_name:string
マイグレーションを実行しておきます。
rake db:migrate
モデル部分の設定
app/models/user.rb
class User < ActiveRecord::Base
  def self.create_with_omniauth(auth)
    create!do |user|
      user.provider = auth["provider"]
      user.uid = auth["uid"]
      user.name = auth["user_info"]["name"]
      user.screen_name = auth["user_info"]["nickname"]
    end
  end
end
self.を使ってcreate_with_omniauthというクラスメソッドを使って新規ユーザーを追加しています。
認証とログアウト
認証とログアウトのためのコントローラーを設定します。
app/controllers/sessions_controller.rb
class SessionsController < ApplicationController
def callback
    auth = request.env["omniauth.auth"]
    user = User.find_by_provider_and_uid(auth["provider"], auth["uid"]) ||
User.create_with_omniauth(auth)
    session[:user_id] = user.id
    redirect_to root_url, :notice => "login"
end
def destroy
    session[:user_id] = nil
    redirect_to root_url, :notice => "Logged out"
  end
end
ログインを分ける
ログインしているユーザーとしていないユーザーがわかるように設定します。
app/controllers/application_controller.rb
class ApplicationController < ActionController::Base
  protect_from_forgery
  private
  def current_user
    @current_user ||= User.find(session[:user_id])
    end
  end
  helper_method :current_user
end
viewの設定
最後にホームページのデザインの部分の設定です。
全体で認証を行う場合で設定しています。
app/views/layouts/application.html.erb
<div id="user_nav">
<% if current_user %>
<%= current_user.name %>さん <%= link_to "ログアウト" ,logout_path %>
<% else %>
<%= link_to "Twitterでlogin","/auth/twitter" %>
<%= link_to "facebookでlogin", "/auth/facebook" %>
<% end %>
</div>
current_userでログインしているかしていないで判別して表示を切り替えています。
同じようにほかの部分でもログインしているかしていないかで表示を切り替えることができます。
これで完成です。
分りません。
app/controllers/application_controller.rbですが、
@current_user ||= User.find(session[:user_id]) if session[:user_id]
とif文をかまさないと
Couldn’t find User without an ID
になりませんか?
あと、SessionsControllerのcallbackアクションのrequestって来てますか?
undefined method `[]’ for nil:NilClass